
This Guide is intended to give you an overview of how to set up and list items to Fulfillment by Amazon(FBA) in Kyozou.
Step 1: Enabling the FBA Warehouse in the Kyozou Control Panel
- Hover over the Administration tab and click on “Control Panel”
- Click on 11) Marketplace Seller Accounts & Settings.
- Now click on your Amazon account below 11) Marketplace Seller Accounts & Settings
- You will see a drop-down menu for “FBA Warehouse”
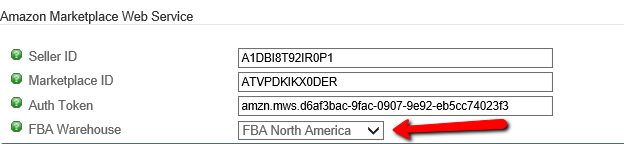
- Select either FBA North America (Covers US, Canada and Mexico) or FBA European Union.
- Scroll to the bottom of the page and click “Update”
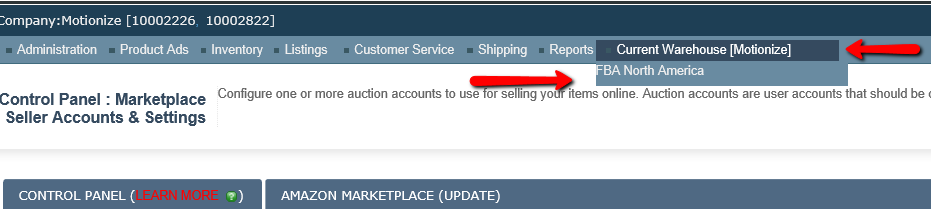
- This will create a new virtual warehouse in kyozou called “FBA North America or FBA European Union, depending what you selected in the drop-down.
- You may need to log out and log back in to see the new warehouse.
- If you hover over the “Current Warehouse” tab you’ll see the new FBA warehouse. You can click on it to navigate to the new warehouse.
Step 2: Importing Existing FBA Items Into Kyozou
If you are currently using FBA directly on Amazon and have inventory listed on FBA, we can import your existing listings into the new FBA warehouse that was created. Please contact your CSM to have these imported.
Step 3: Listing New Products From the FBA Warehouse
All products listed from the FBA warehouse will be listed as “Amazon-fulfilled” Status.
Once you have items ready to list to FBA, follow the steps below:
- Hover over the “Listings” tab then “Amazon Marketplace” and click on “Launch New Listings”
- Select the items you want to Launch and click “List to Amazon”
- In this next page, you can edit the Price, Condition, ItemID type and ItemID (although this should be pulling the information you have already entered into the product level and it’s recommended to correct information there instead of here). However, you can’t edit the quantity on this page. The quantity is controlled by Amazon and it’s updated once your item arrives at their facility.
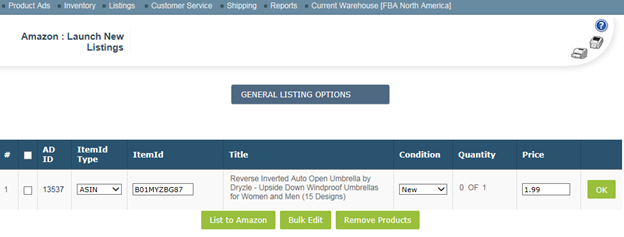
- You can specify the quantity that needs to be sent to Amazon when you create an “Inbound Shipment”. which will be covered in Step 4 of this guide.
- Now Click on “List to Amazon” to launch it to Amazon.
Note – Listings will be launched with 0 quantity initially (out of stock) until your items arrive and are accepted by Amazon, then their true quantity will be updated and reflected in Kyozou making your listings active)
Step 4: Listing New Products From the FBA Warehouse Using Multi-Lister
- Hover over the “Listings” tab then “Multi-Lister” and click on “Launch New Listings”
- Select the item you want to list and click “List to Multi-Lister” You’ll be taken to the confirmation page.
- Once again you won’t be able to specify the Quantity, that will be done in the next step. Click on “List to Multilister” to launch it to Amazon and eBay.
If you are planning on using FBA with Multi-Lister you will need to have Out of Stock enabled for your eBay listings.
When an item is launched from the FBA warehouse with Multi-Lister, the listings get created as an Out of Stock listing on eBay. Once Amazon receives the items to their fulfillment center the quantity will get added to the listing on eBay.
Step 5: Creating an FBA Inbound Shipping Plan
Once your item is showing listed on Amazon with no errors we can now create an Inbound Shipping Plan.
- Hover over the “Listings” tab then “Amazon Marketplace” and click on “Current Listings”
You will see some new columns have been added to the Current Listings page in the FBA Warehouse.
Total Quantity – The total item quantity that a seller has in Amazon’s fulfillment network supply chain. This includes inventory that is available for shipping, inventory in inbound shipments, and inventory being transferred between Amazon fulfillment centers.
InStock – Inventory is in an Amazon fulfillment center
Inbound – Inventory is in an inbound shipment to an Amazon fulfillment center
Transfer – Inventory is being transferred from one Amazon fulfillment center to another
FNSKU – The Fulfillment Network SKU (FNSKU) of the item. The FNSKU is a unique identifier for each inventory item stored in an Amazon fulfillment center. Amazon will create this SKU themselves.
EarliestAvailability – The earliest date that your inventory is expected to be available for picking.

- Select the item or items you would like to send to Amazon’s Fulfillment center.
- In the “Choose One” drop-down select “Send Inventory to FBA” and you’ll be taken to a new page to create the Inbound Shipping Plan.
Shipping Plan – Every time you want to send a new batch of items to Amazon’s fulfillment center, you will need to create a new shipping plan. You can also add items to an existing shipping plan that has not been shipped to Amazon by selecting it in the drop-down. Plans are created based on date and time.
Ship From – This is where you set the address that you’re shipping your items from. The current address that you see on this page is taken from your warehouse settings. You can create a new address using the “Create New” option.
InboundGuidance and GuidanceReason – Inbound Guidance is a recommendation from Amazon whether you should ship the item to them or not.
Inbound Guidance could be either “NotRecommended” (Shipping this item to Amazon’s fulfillment network is not recommended) or “OK” (Shipping this item to Amazon’s fulfillment network should not cause any problems).
If “Inbound Guidance” is “NotRecommended”, “Guidance Reason” explains why.
- As mentioned in Step 2 of this guide, this is where you can specify the quantity that you want to send/list to Amazon. Click the “Edit” button and Specify the quantity for each item. Click “Ok” once you’re done.
- Click the “Send Inventory” button.
- You will see a message appear at the top of the page with a link to the Shipping Plan on Amazon. You will need to click on that link and complete plan directly on Amazon.

- Here is a guide on Sending/Replenishing for the Shipping Plan on Amazon: https://sellercentral.amazon.com/gp/help/help-popup.html/ref=pt_201021880_cont_xx?ie=UTF8&itemID=201021880#
- Once Amazon receives the item the quantity will be reflected in the active listings page and you’ll see an FNSKU appear.
Step 6: Processing an eBay order or POS/eCommerce Order.
Processing an eBay order or POS/eCommerce order is virtually the same as before. The only difference is the Shipping Service Level that you need to pick when processing the shipment.
- Hover over the “Shipping” tab and click on “Process Shipments”
- The first ready to ship order will appear.
- Add your weights and dimensions (if you haven’t already entered on the product level)
- Click on “Recalculate” (Also Mark Order as Closed and Shipped Upon Processing to ensure that the venue is being updated)
- You will see 3 new service levels:
FBA Standard
FBA Expedited
FBA Priority

6) Click on the “Print Label Now” checkbox and click on the “Print Labels” button.
7) The information will be sent to Amazon and they will ship out the product.
Leave A Comment?
You must be logged in to post a comment.