Summary
User Accounts are created to maintain different log-ins and permissions for your employees which helps you to track their work history. It is highly encouraged to provide a separate log-in to each employee with specific access levels/roles so the user statistics stay accurate when you are viewing them.
Task Requirements:
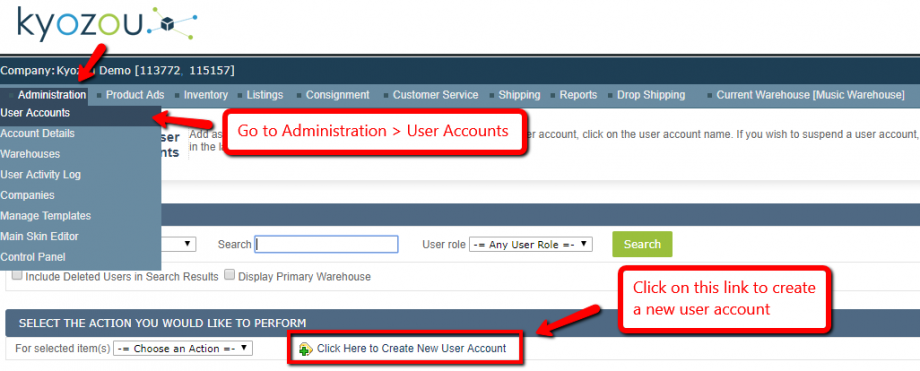
1- Go to Administration > User Accounts (click below for more information)
2- When you access “User accounts” page, you will see a summary of all existing user accounts. When you first sign up for the account, your sales representative will create an “Administrator” account for the point of contact. It’s up to the Administrator to create the other user accounts.
3- Click on the link “Click Here To Create New User Account” (click below for more information). You will be taken to a blank user screen where you can fill out the necessary fields to create the new user in your Kyozou account.

Any field with an * is designated as a mandatory field.
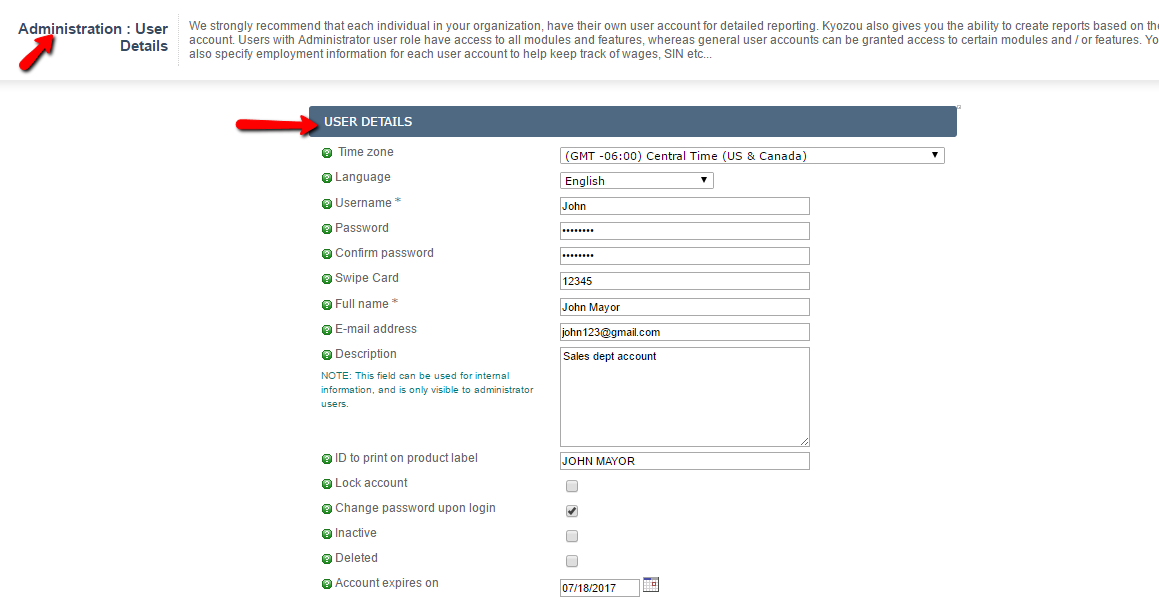
As seen in the image above:
- Time zone: Select the timezone where the user is located.
- Language: Select the preferred language for your user.
- Username: Fill in a username for the user. They will use this later for sign-in purpose.
- Password: Enter/modify the password for this user account.
- Confirm Password: Must be the same as the password entered in the previous field.
- Full name: Enter the full name of user.
- E-mail address: Enter a valid email address of the user.
- Description: This field can be used for internal information, in case you need to make any notes about this particular user, and is only visible to administrator users.
- ID to print on product label: This is what will be shown on “Product Labels” for this user. This is an optional field when setting up product labels in Step 3 of the Control Panel. Some companies want to know who created the product the label is being printed for.
- Lock Account: Check this if you want to temporarily lock an account (not allow access to a user).
- Change Password upon login: Check this if you wish for user to change their password upon login.
- Inactive: Check this to stop a user from logging in, but still keep their history within the software. For ex: when an employee leaves your organization, you can still see their name when looking at product history.
- Deleted: Checking this option will completely delete this user account from system, when saved.
- Account expires on: Set an expiry date for this user account. After that date, the account will no longer will usable.

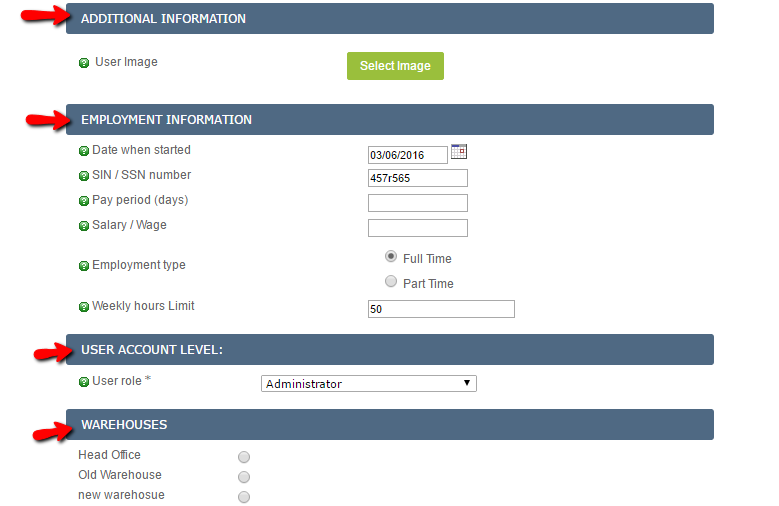
As seen in the image above:
Additional Information
- User Image: You can use this option to upload a picture for this user.
Employment Information
- Date when started: Enter the date when the employee started with the organization for your own records.
- SIN/SSN Number: Enter the employee’s Social Insurance Number.
- Pay period: Enter the pay period of employee (bi-weekly/monthly).
- Salary/Wage: Enter the employee’s salary/wages.
- Employment Type: Select if employee is full-time or part-time.
User Account Level
User role: Here you will select the user role/permission of the user. The available options are explained below:
- Administrator: This role has permissions for all areas in the system with full control over your account.
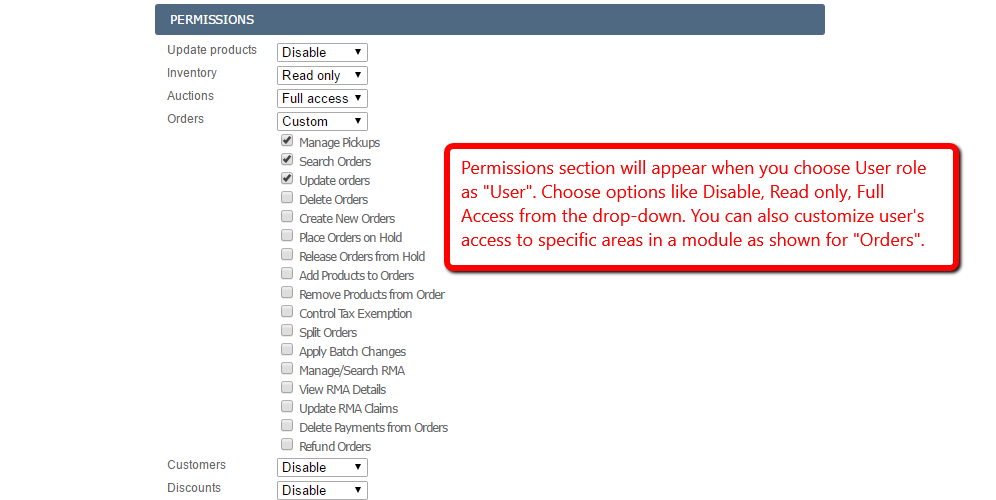
- User: Once this option is selected, you will see two new sections. “Warehouse” section is used to control the user access to all warehouses whereas “Permissions” section is used to control user access for main modules in the system (click below for more information). In the “Permissions” section drop-down- choose ‘Disable’ option to remove user’s access for that module; choose ‘Read Only’ option to provide access to the information but the content remains uneditable; choose ‘Full Access’ option to give user full control over all areas; lastly, ‘Custom’ option can help you to customize user’s access to specific areas within that module (checkmark the required areas).
Once you are finished, click on “Insert” to create and save the user account. To edit an existing user account, click on the “Username” and it will take you to “User Details” page.


Leave A Comment?
You must be logged in to post a comment.