Summary
This page will help you to create reports with more accuracy and ease. Once you generate a report, it will be ready to download within the next 45 minutes depending on the requested data.
Before you start:
- Go to Reports > Report Builder. You will be navigated to the Report Builder page.
Task Requirements:
Create new reports
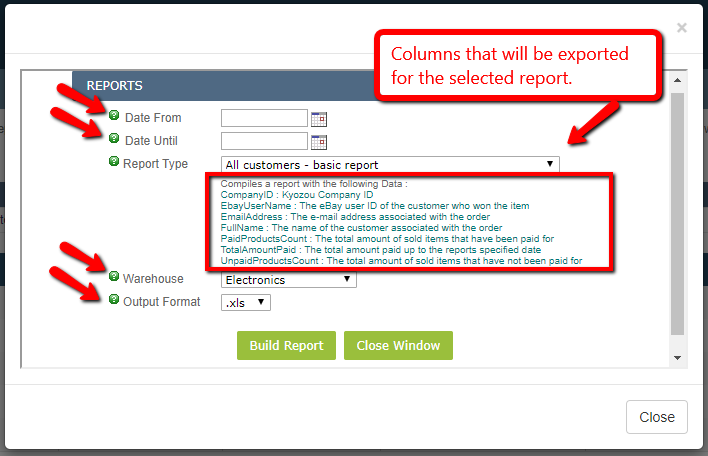
- Click “Create new report” and a pop-up will appear (see the picture below).

- Enter the date from, date to, report type, warehouse and output format for the products and click Save. Depending on the report type, you will see a number of columns that will be generated in the report (see the picture below).

- If your report is ready, a download option will appear in front of the report. You can always export reports in different formats like .xls, .csv etc.

There are two more options available for reports:

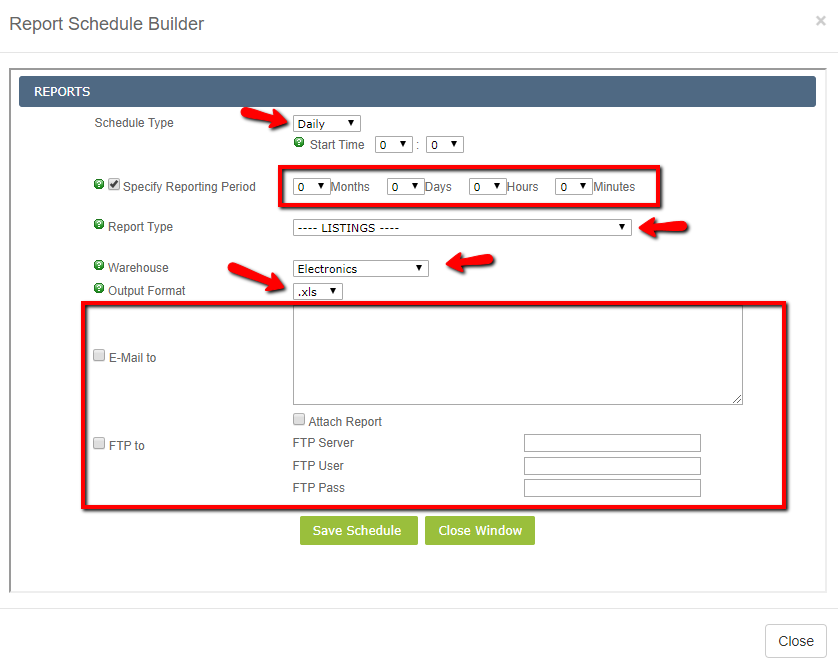
1- Create Report Schedule: Click on this option to create a report schedule for your listings. A pop-up will appear where you can enter the schedule type, start time, specify the reporting period (months, days, hours, minutes), report type, warehouse, output format.

As seen in the picture above:
- Schedule Type: Daily, Weekly or Monthly.
- If you choose Weekly, you’ll be able to select which day of the week to generate the report on.
- If you choose Monthly, you’ll be able to specify which day of the month to generate the report on.
- Start Time: divided into hours and minutes. Specify when to start generating the report.
- Note that depending on the report and the reporting period, it may take up to 30 minutes to generate the report. If you’d like the report to be available at 8:00 am, for example, set the start time to 7:30 am.
- Specify Reporting Period: Select the time-period the report should cover.
- Report Type: Select the type of report you want to generate.
- Warehouses: Specify which warehouses should be included in the report.
- Output format: Formats available are xls, csv, txt, xml, xls and xlsx. By default, xls is selected.
- Attach report: Checkmark this if you want to attach the report into the email.
- FTP to: This option will allow you to set up the report to be sent by FTP hosting to a specific hosting address of your choice. You would need to provide Server, Username and Password.
2- Manage your scheduled reports: Click this option to manage your scheduled reports. You will be navigated to the schedule manager page.
- From this page, you can edit the report schedules and delete the reports. On the right-hand side of every report, an EDIT icon is provided which allows you to make changes in the report schedules.

How to delete reports
- Click on “Manage your scheduled reports” and you will be navigated to the “Schedule Manager” page. On this page, choose “Delete Reports” from the drop-down to delete the selected report(s).


Leave A Comment?
You must be logged in to post a comment.