
Summary
On the Process Shipments page, you can process and review shipment details.
Before we start..
- Locate Shipping in the menu and click Process Shipments and you will be navigated to the Process Shipments page. The most recent order that’s in Ready to Ship status will be displayed.
Sections:
Customer Information
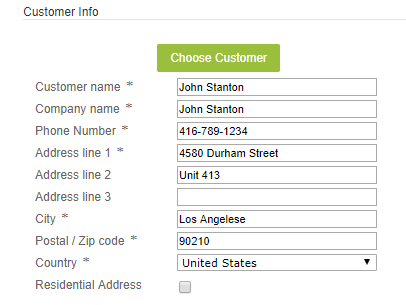
- In this section, you can enter/edit basic customer information like name, address, city, country, postal code, phone number etc.
- Choose customer: A pop-up will appear where you can search and select existing customers.
- Residential Address: select this checkbox if you are shipping to a residential address. (Shipping surcharge may apply).
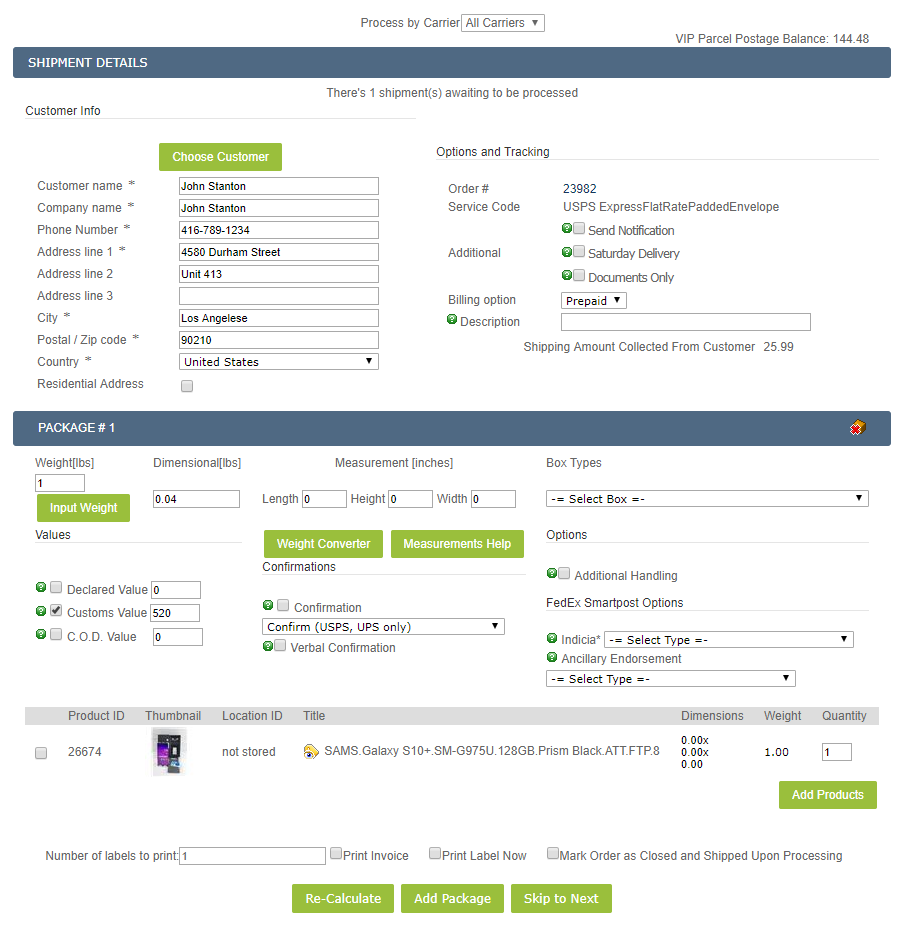
Options And Tracking
![]()
- Click on the Order # to go into the order details page.
- Service Code: This will show the shipping service level selected by the buyer.
- Additional Options: You can checkmark other options like Saturday delivery, documents only(contents are all documents) or send notifications to an email address (by default the notification will be sent to the email address taken from the order details).
- Description: This field allows you to enter a description of the items being shipped. By default, it shows the product title but if you are shipping multiple items, it will ONLY copy the title of the first product.
- Loading dock, Liftgate, Construction site: You can choose these options for freight shipping services (will affect the rates).
Package Options
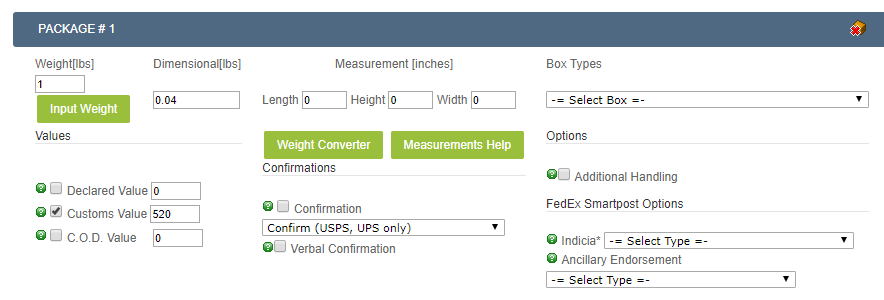
You will need to fill out a set of fields every time you add a new package.
- Weight: Add the weight for the product. Click the “Input weight” button to set the weight by ounces and pounds or by kg and grams.
- Measurement (in): Add dimensions for the product (inches). You can also use a weight converter or Measurements help.
- Boxes: Choose an existing box from the drop-down. (This is a short cut for the step above).
- Values: Mention the declared, customs or C.O.D values for the product.
- Declared value is the amount you will declare for the goods shipped, based on this amount the package will or will not include insurance which will change the shipping cost rates.
- The customs value is only needed for international shipments. It’s required to declare the cost of the goods being shipped internationally.
- C.O.D is cash on delivery cost if applicable.
- Confirmations: Mention the way for confirmation on the delivery of the product, for ex: Adult Signature Required, etc. You can also check “Verbal Confirmation” as one more way for confirming the delivery.
- Options: Checkmark “Additional Handling” if it is needed.
FedEx Smartpost Options
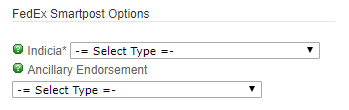
- Indicia: Choose the Indicia service from the drop-down, for ex: Media Mail, Parcel Select, etc. There are some weight restrictions for these services:
- Media Mail:
- Parcel Select: 1lb or more (max 70lbs)
- Presorted Bound Printed Matter: 15l?bs or less
- Presorted Standard: Less than one lb
- Ancilliary Endorsement: Endorsements are instructions for USPS on how to handle the undelivered package.
- Return Service Requested: Undelivered mail is returned to you with the recipient’s new address or the reason for nondelivery (no charge).
- Forwarding Service Requested: If the recipient has a change of address on file, mail will be forwarded for a year. In months 13-18, the mail-piece is returned to you with the recipient’s new address. After 18 months, mail is returned to you with the reason it couldn’t be delivered. All for no charge.
- Address Service Requested: In the first year after the recipient moves, the mail is forwarded. You’ll be given their new address and charged an address correction fee. In months 13-18, the mail-piece is returned to you with the recipient’s new address, at no charge. After 18 months, the mail is returned with the reason it couldn’t be delivered, for no charge.
- Change Service Requested: You’ll be notified of the recipient’s new address or the reason the item couldn’t be delivered and charged an address correction fee. The mail-piece is discarded or recycled.
Package Products
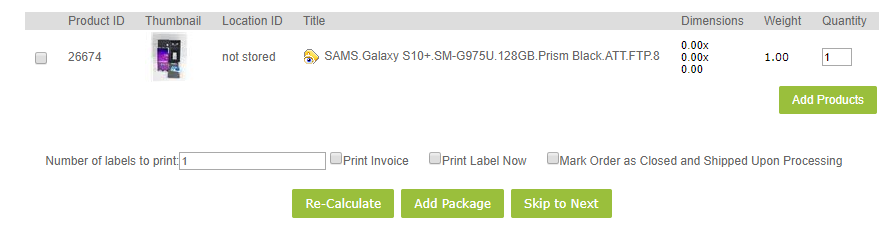
Under this section, you will be able to see all the package products you have added in the packages (one or multiple).
Print Options
- Print Invoice: Checkmark this to print the invoice.
- Print Label Now: Selecting this option will request the label immediately. You will be able to print the label within 10-15 seconds. Leaving it blank will set the shipping to “Processing” status. The label will be available to print within 15-20 minutes from the “Manage Shipments” screen. You can continue processing other shipments while labels are being processed.
- Mark order as closed and shipped upon processing: Use this option to mark the order as closed and shipped after processing the shipment. You can specify the number of labels you want to print.
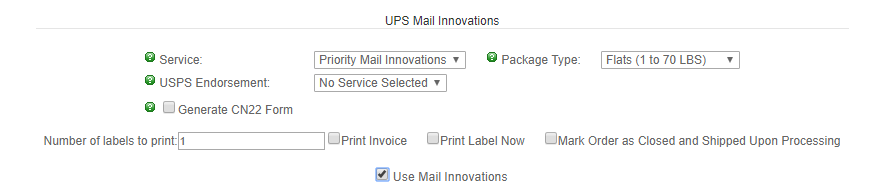
- Use mail innovations (UPS): You can specify the Shipping Service, Package Type, and checkmark “Generate CN22 form” and print the CN22 label.
- Re-calculate: Click this button to re-calculate the shipping service costs for the order(s). Once you choose a shipping service, click the “Process Shipment” button to process it.
Note: It is recommended to click “Mark order as closed and shipped upon processing” when printing your label as tracking information goes to all venues when the order is closed.
- Skip to next: You can skip to the next shipment if you are not ready to process the current one.
- Add Package: You can add multiple packages to one shipment, for ex: Package#1, Package #2 etc.
- More (Additional) Options:
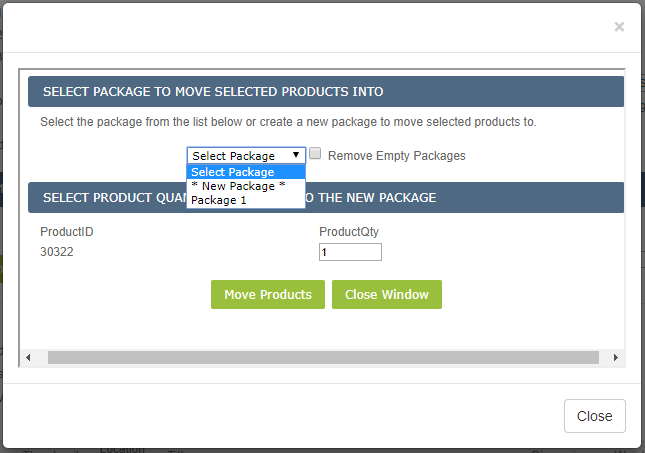
- Move selected products to other package: You can move selected products to any package. A pop-up will appear where you can select the existing package or create a new package. You can always remove the empty packages by selecting the option “Remove empty packages”. Also, you can select the product quantity to add to the package.
- Remove selected products: Use this option to remove selected products from the packages.
- Move selected products to other package: You can move selected products to any package. A pop-up will appear where you can select the existing package or create a new package. You can always remove the empty packages by selecting the option “Remove empty packages”. Also, you can select the product quantity to add to the package.
Leave A Comment?
You must be logged in to post a comment.