
Summary
This article will explain how to edit the sliders/banners for a particular ecom template in Control Panel Step 17. In addition, you can learn how to find the find the dimensions of banners and slider images in the ecom website.
Task Requirements:
- When logged into your account, in main menu select Administration> Control Panel and navigate to Step 17 in the control panel menu.
- Scroll to the bottom and click on “Customize E-Commerce website content” (see the image below).
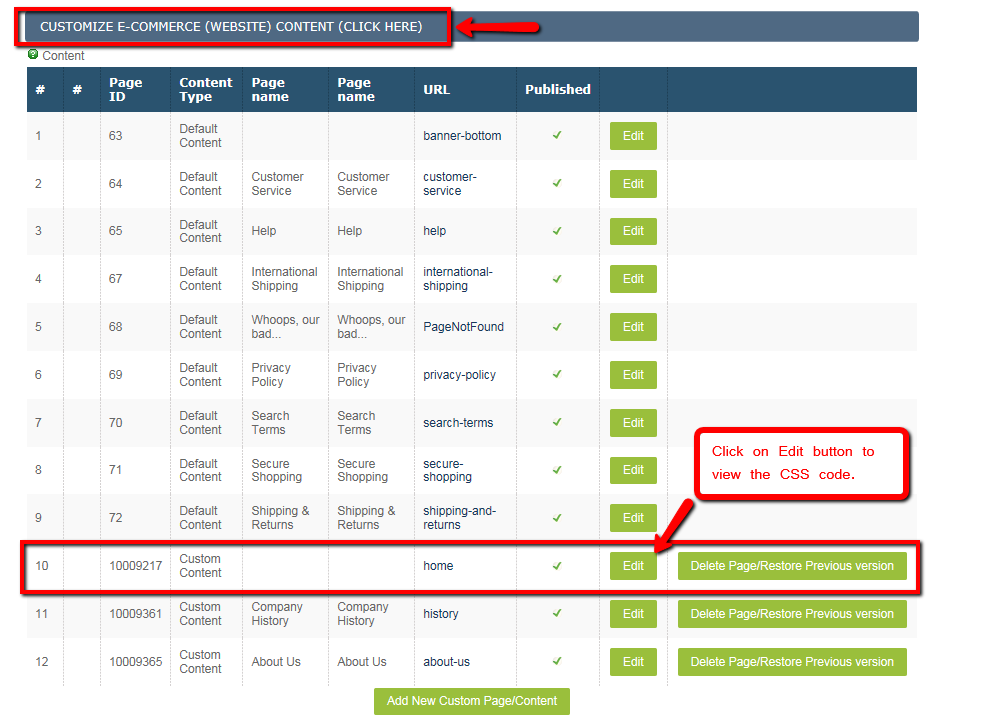
- To customize sliders/banners for the eCommerce template, go to the Home page and click “Edit” (see the picture above).
- A pop-up will appear where you can edit the details of the webpage with separate HTML and design section.
- Go into the HTML section and scroll to find the css class where all the slider images are included (see the image below).
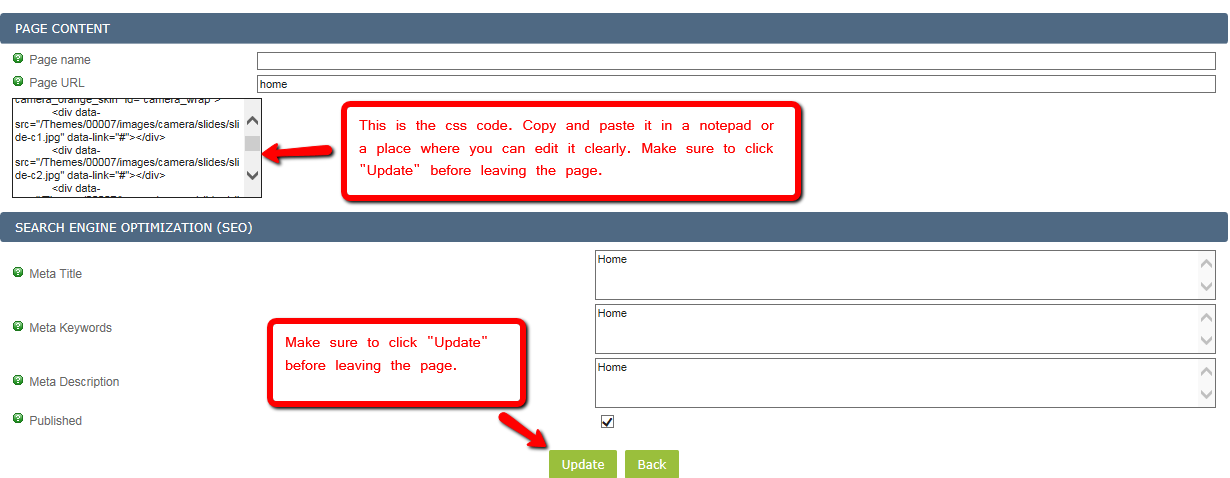
- Once you find the existing image URLs, replace them with the new image URLs and click “Update”.
Note: New image URLs can be obtained either by hosting the images on the Kyozou server or any other server of your choice. The images can be hosted on free sites such as imgur.com or photobucket.com but you should create and use images with correct dimensions as per the container. If an image is too small, Kyozou will expand it and vice-versa.
An example to clarify it further:
<div class=”fluid_container”>
<div class=”camera_wrap camera_orange_skin” id=”camera_wrap”>
<div data-src=”https://hosting.kyozou.com/Exampleimage/1.jpg” data-link=”#”></div>
<div data-src=”https://hosting.kyozou.com/Exampleimage/2.jpg” data-link=”#”></div>
<div data-src=”https://hosting.kyozou.com/Exampleimage/3.jpg” data-link=”#”></div>
</div>
<div class=”clear”>
- You can also make your images point to a specific URL, for ex: if you replace the “#” with a valid URL (www.google.com), then the visitor will be taken to this website once they click on the image. If you want the image to point to an internal page (for ex: About Us page) within the website, then replace the “#” with /about-us.
- Most themes allow you to add more than 3 sliders/banners. In order to do that, add another block (highlighted on the code snippet below):
——————————
<div class=”fluid_container”>
<div class=”camera_wrap camera_orange_skin” id=”camera_wrap”>
<div data-src=”https://hosting.kyozou.com/Exampleimage/1.jpg” data-link=”#”></div>
<div data-src=”https://hosting.kyozou.com/Exampleimage/2.jpg” data-link=”#”></div>
<div data-src=”https://hosting.kyozou.com/Exampleimage/3.jpg” data-link=”#”></div>
<div data-src=”https://hosting.kyozou.com/Exampleimage/4.jpg” data-link=”#”></div>
</div>
<div class=”clear”>
———————————
- As seen in the example above, you will notice that all the images URLs (ending with .jpg suffix ) have been written inside the fluid_container class. Simply replace these URLs with the new image URLs and click “Update”. You should edit the URL within the quotations, for ex: ‘www.hostedimage.com/pics/image1.jpg‘. If you delete a quotation mark, it will corrupt the file.
Leave A Comment?
You must be logged in to post a comment.